Twitter / pixie_me

Monday 28 June 2010

No-Bake Strawberry Cheese Pie.

I suppose a big apologize is in order... so sorry if anyone had been expecting more posts, I know I said I would be posting frequently but lately I've also been seriously working on my MS and editing and proofreading and sometimes I don't get enough time to edit-read-cook and post. Still I hope you can all forgive and enjoy the following mouth watering sugar rush recipe.

I saw this recipe in foodgawker (obviously) and HERE you can find the original recipe. 

I would have said that this recipe was seriously sugary, even for me. And that's like saying a lot. But... do to the current mood I am in I will say: You should probably add more sugar to induce the happy-hormone liquid thing. 

Okay so enough boring you with my mood and me wanting to add sugar to everything in order to feel better. Let's get on with this: 

1/4 cup of cornstarch. 
2 1/4 cup of sugar goodness. 
1/2 cup water.
1/4 of strawberries 
2 or 4 blackberries. 
1 stick of butter. 
1 package of graham crackers 
(otherwise known as Maria) 
1 big package of cream cheese. 
(Use light and I'll personally hunt you down and kill you. Live a little will ya?) 
1 tsp of vanilla.

Okay here goes: 

First you mix the cornstarch with the water, berries and 3/4 cup of sugar. 
(Now, usual me wants me to tell you that you should probably add half of that. Right Now me screams: MORE SUGAR)

And you want to cook this in medium heat until it thickens. 


Oh you also want to stir constantly just get all the ingredients together. Otherwise you'll end up with lumps of cornstarch and that's not a pretty sight now is it? 

Meanwhile! You crunch the crackers and mix it well with the stick of butter. 
And then place it on the nice bowl you want to put the rest of the pie in. 


Then you and I are going to work that spatula. Because the next step is mix 1 1/2 cup of sugar with the cream cheese and add the vanilla and work that spatula until there are (almost) no lumps. 
Work it baby! Work it!


Just you know mix it at a break your arm speed. That'll probably do the trick. 

Okay, next step. Pouring the cream cheese filling into the nice pretty bowl we already placed the crackers mix in. 
And then, we add the berry mixture (which has to be cold of course) and we open the fridge and let the pie chill for a while. 
 n.n and there you go as simple as that. 

If you want to see the real pretty step-by-step pictures I urge you to visit Arena's blog.

Tuesday 15 June 2010

Frijoles Charros (Real mexican charro beans)


A few days back, my mother bought this "Mexican Recipes" book, quite frankly I thought it would be a lame book to have. But as soon as I began reading and browsing through the recipes I realized it was a great book. It had a lot of the recipes I like and those I've always thought to be of a champions league... like Pozole or Chiles en Nogada even Cochinita Pibil. 
So after falling in love with the endless recipes and different types of cuisine I decided to try at least one. 

There is a small place near my house, probably one of the only places where I actually eat meat. As you wait for your food they give you Charro Beans (free of charge n.n) and they are heavenly. 
So it was probably one of the main reasons why I decided to try out this recipe in the first place. 

Even though I live in Mexico, I will admit I hardly know anything about our very extent and infinite varieties of cooking that have originated here. 
The small things I know, I owe to my grandma (who has this way of cooking that is simply divine) and I will admit that I was very much impressed with all the recipes the book my mom bought held. 

I know that Mexican food outside Mexico sucks and even when people attempt to do it, they end up with this seriously sick and awful version of our dishes (I am talking tacobell) so I take it as a personal challenge to show typical Mexican recipes every once in a while, just to set people straight for once. 
(I don't mean any disrespect though) This is Mexican cooking according to a Mexican recipe book by a Mexican chef done by me a 100%  Mexican gal. 


Frijoles Charros 
a.k.a 
Charro beans. 

250g of beans. 
 (You can use any type of beans you want, I used Pinto beans) 
Beacon. 
(I used three stripes) 
1/4 of an Onion, chopped. 
2 Tomatoes, chopped.
I clove of Garlic, thinly chopped. 
Olive Oil. 
1 Chile, chopped. 
1 teaspoon of Salsa Chipotle (optional) 
Salt&&Pepper.

(I decided to ignore the Chorizo the recipe calls for, because I am not into it, but by all means if you like it, do add it) 


Work that magic: 

1. First you need to cook the beans. And in order to have very good beans it's a good idea to leave inside a pot with water overnight. When you cook the beans be sure to add one clove of garlic, a small piece of an onion and a tomato, this will add flavor to beans instead of dealing with plain watery tasting beans. 

2. Once you've cooked your beans, taste, season and then set aside... you'll want to chop the beacon. 

Now, in a previously hot skillet, drizzle some olive oil on it and add the beacon. Let it fry there for a while until the beacon realizes its fat (sounds disgusting but I swear it's delicious). 

(If you decide to use the Chorizo this is where you add it) 

2. Once the beacon in reaching a goldish color add the onion, tomatoes and garlic and fry them for a while. 


You want them veggies to be very soft before following the next step. 

3.  Season with Salt&&Pepper, add the Chile and the Chipotle Salsa and add this beautiful, colorful mixture into the pot where you cooked the beans (at this point you can either transfer the beans and the mixture to a different deep pan). Give it a nice shake so that all the ingredients come together. 

And by all means, serve. 


Wednesday 9 June 2010

I wonder what would be of me if I lived near the coast...


Ah! The heat... while some people (my boyfriend and sister) find this June terribly awfully hot, I find it lovely. 
Not only is everything getting green and the sky is always blue with white clouds, but I don't have to wear socks to bed anymore n.n which is great! I love sleeping without socks and wake-up without a soar throat. It is brilliant for me. 
And let us face it, Hot weather always gets me on this Caribbean-mood, and I don't just mean wanting to put a swimming suit and buy one of those kiddie pools they sell on the supermarket, I mean cooking in that sort of vibe. I am talking: Fresh, lemony, vibrant, exotic seafood.
And just, how lovely and brilliant seafood is? Am I right? Of course I am right. 
So, I humbly bring to you this over the top, A-maaa-zing, beautiful dish: 
I give you 

Red Snapper fillets wrapped in fried banana coconut balls 
otherwise known as:
The Delish Balls.

You shall be needing: 

2 fillets Red Snapper fillets. 
(Now, I actually used 4, which was a mistake. You can use 4 fillets but then you should probably use twice the amount of banana as well) 
2 Platains (A.K.A the big ripe bananas)
1/4 of a Red-Purple Onion
1 Clove of Garlic.
1 half of a dry Guajillo Chile. 
Olive Oil.
Lemon Juice. 
Dry Coconut.
One ripe Avocado. 
Salt && Pepper.   

Let us begin: 

1. First chop your platains --bananas, in big chunky slices, like so: 
Next in a deep pan, pour in some water and once it starts boiling add the bananas and leave them there for a while. You want to leave them there until they soften up, because as you already know (or will find out once you cut the platain) it is actually a very hard-ish type of banana.


This will probably take around 15 minutes or so, 

2. Meanwhile, chop your onion in small delicate pieces, your garlic and chile. 


3. In a previously hot skillet, drizzle it with some olive oil and add the onion. Once it begins to have a certain golden color add the chile and the garlic. (Know I played a very nice trick here, my mom had roasted some tomatoes and green chile in that same skillet, so I stole it once she was done with it and didn't wash it, hence, keeping the tomato and chile flavor) 


See that? Delicious. 

3. Once your ingredients are nicely cooked add your fish and just let it take in the smell and favor of the mix. 
Once your fish are nicely cooked, place it in a small bowl and add the lemon juice. 


4. Now let us get back to our bananas. You'll know it is time to take them out because a) they'll be loads softer and b) they'll be a lot more yellow. 


Now, peel your bananas. 
I actually enjoyed doing this bit a lot because of the "tails" They looked so pretty. 
Almost like a flower. 


Of course you need to be careful peeling them. You actually need to wait a bit, otherwise they'll be too hot and you'll burn yourself, which is always such an embarrassing deal.
Also you need to do a vertical cut to make this easier. 

5. Next you need to pure your bananas. 

6. Make the banana balls. 
Now this is a lot more harder than I first thought it would be, but it was so much fun as well n.n 
Okay once you have pured the bananas you need to take this small quantity and try to convert it into a small ball.
You also need to use a plastic paper bag or something and drizzle it with a bit of olive oil and place the banana ball on it. Fold the bag over the ball and pat it. Unfold the bag and place some small bits of the fish into them.
THIS IS THE HARD PART!
Slowly, begin folding the paper so you make the ball. This is quite difficult because you need to mold the ball using the bag.
Your result? 


Ugly sort of round looking banana balls.

7. Okay know you pass them over the dry coconut. Make sure your coconut is cold, because it will make the ball easier to mold and hold. 
Voila!


8. In the same pan you boiled the bananas, pour some Canola oil and let it heat up before adding the balls. (Of course you need to rid the pan of the water you used before) 
Fry'em balls!

Chop the Avocado in nice thin slices. Pour some lemon juice and season with Salt&&Pepper.
And by all means, EAT!


Comments much appreciated
n.n 


Friday 4 June 2010

Aguita para el Calorsito!


Who isn't in mood for some fresh Water? 
Everyone, right? 
Right. 

 I'm a big sweet-tooth so when I saw the recipe that called for Strawberry & Vanilla sweetened 
with Honey I went craaazy over it and could not wait to try it. 
All I can say is: Oh My God.

The freshness of my very ripe strawberries and the deliciousness the Vanilla added, and just leaving a sweet
Honey flavor at the end. Really a drink I would offer the Olympic Gods without any sort of hesitation (granting me a constellation of my own, which would be pretty cool, maybe even my own myth...Now that would be AWESOME.) 
So before I start babbling on and on about what kind of myth I would like for myself or the very artistic shape and meaning of my constellation I will tell you the recipe for this Godly Award Drink that it's so easy to make us mortals can do it. 
(and end up with constellations of our own I might add) 

OkayOkay I'll get to the recipe already!

Fresh Strawberry&Vanilla Water
Sweetened with Honey. 

1 cup of fresh, ripe Strawberries. 
2 Teaspoons of Vanilla. 
1 tablespoon of Honey. 
2 cups of Ice-cold Water. 

1. I placed the two cups of water in the freezer a few hours before I made the water. My cold water actually froze and by the time I had to add the water there was still huge ice cub in the cup I used. 
The better for me. It looked pretty cool actually. So first step either make ice cubes or freeze your two cups and take them out just a few minutes after they have been frozen. 

2. Combine both Strawberries and Vanilla and let the blender... yes! work its magic, all right. 

3. You can either pass the mixture into the container you are going to serve the water in, or into another one so you can sweet-it up. I served it on a different container and stirred the tablespoon of Honey until it dissolved into the water. 

4. Then, I added more water. 

Serve with a nice small strawberry in a fancy cup or glass. 


Thursday 3 June 2010

Grouper fillets in lemony buttery ice-wine sauce w/ bananas.


Ah! Butter! 
I love butter there is no secret about that. 
I love butter because it has a way of making everything so delicious and it basically goes with almost every type of food. What a wonderful thing, right? Butter. 
It even sounds nice. 
Butter. 
Butter.
Butter.
I am going butter crazy!

Anyway, YES, this fish fillet has butter, but it is not the secret ingredient that makes the sauce so delicious. What I've done to make this ultra delicious and unique is 
instead of using regular boring white wine... I've gone an extra mile and used: 
ICE WINE. 
(which I also love) 
and BAM 
I got this really-really good sauce. 
But I didn't want my fish fillet to be so boring, I mean, it was great, don't get me wrong, but it still missed something, like that little idkwhat that so often hunts when you are cooking something.
A little something extra...


Grouper fillet in lemony buttery ice-wine sauce
with Bananas.  

4 Grouper Fish Fillets. 
Olive Oil. 
Ice Wine.
Salt && Pepper.
Lemon juice. 
Bananas. 

Work my magic: 

1. Okay, as you know I am a huge fan of seasoning and this fish fillets aren't the exception, although this seasoning is a tiny bit different than the ones I have been doing lately. 
First of all I made the sauce first. So, put a little bit of olive oil in a small bowl along with the ice wine (or white wine) stir that a bit and place the fillets one by one inside.and let them stay there a while. 


2. Meanwhile heat a skillet and melt a small piece of butter and lemon juice. Let it simmer for a while and use this time to take the fillets out of the sauce and place small pieces of butter and few drops of lemon juice in one side. Fold it carefully before seasoning it with Salt and pepper on one side only. 


3. Remember we want the fish to be soft and juice. So it is vital you try to keep butter from dripping out of the folded fish. 
Once the skillet is hot enough place the fish on it a and cook it on one side around a minute and then turn it over and leave it there another minute or so. 


4. Now, the sauce in which me "marinated" the fillets is going into that hot skillet along with chopped bananas. 
Let them simmer and take in the juices from the fish and the sauce. 
Around 4 minutes, or until they are so tender they almost break when you touch them. 


5- Serve and pour into the different dishes whatever is left of the sauce n.n and if you wanna look real fancy cut some very thing slices of lemon and use them as garnish n.n 

Tuesday 1 June 2010

Apple "Cobbler" n.n


The Apple Cobbler. 
Okay I'll be honest. This originally was supposed to be a Crumble Tart...but it didn't turn out that way, hence, the cobbler which I think is a name that is weird and different from the word Crumble and it also has a certain idk what that makes it sound nice. Right? Right? Right! 

As a Crumble Tart I'd been wanting to make one of those for a while now, but they seem like a Christmas sort of dessert. Plus, the other thing stopping me was my oven (which by now ya'll know it is useless) but I decided to go ahead and bake the crumble tart as I would an ordinary cake. 
I cannot say SUCCESS! Because I was expecting something with a more crumble-ish crust but it was still yummy. The apples were just amazingly delicious with just the softest hint of vanilla and lemon. 
The "Crumble" was okay, but I guess it needs more sugar and probably the egg yolks I decided to skip... 
Plus it made my house smell so nice n.n 

In other completely non related news. I have decided to remove Gordon Ramsay from my top #1 TV chef spot and place Jamie Oliver instead. I enjoyed his recipes and garden today while I waited for the icecream and the cobbler to be ready. And may I say, WOW great chef, great recipes, pro healthy and pro veggies! 
So expect some challenge soon (you want it now, you send me a copy of his latest recipe book). 

Okay! let's get to the recipe already!!

For the crumbles or cobbler: 

1 1/2 cup of flour. 
1/4 cup of sugar. 
A pinch of Salt. 
1 stick of butter, but into small pieces. 
2 egg yolks (which I didn't use) 
1/4 cup of Sour Cream. 

For the Apples: 

2 small apples ( I used three golden apples) 
1 tablespoon of butter. 
2 tablespoons of Sugar. 
1/3 cup of vanilla. 
1/4 teaspoon Lemon zest. 

Work the Magic like so: 

1. You are supposed to preheat the oven of course... but SCREW THAT!  My first step was to peel, core and slice the apples.


2. Next Melt the tablespoon of butter in Medium heat. Once it has melted add the apples, the vanilla and the lemon zest and stir every few minutes. Leave them there until the apples are soft. 
(I put a lid over them so the smell and everything would stick better, plus it quickened the process) 
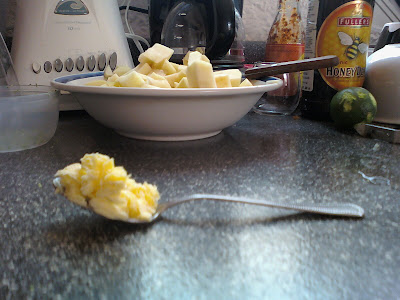
Once your apples are ready they'll end up looking like this: 
So now you'll need to set them aside and let them cool off a bit, so we can work the cobbler next. 

3. In a big bowl mix together the Flour, Salt and Sugar and stir. 
So you can then add the butter. 

Lovely picture right? 

4.Next you need to mix the butter and the flour mixture, not entirely but until it comes of as a sandy consistency. 

5. This is the step where you are supposed to mix the yolks with the sour cream before adding them to our crumble mixture. I just added the sour cream and mix it up again. Now remember it can't come together entirely! you want the mix to be crumbly. 
Once you are convinced with the results toss them from side to side with your hands before adding 2/3 of it to the "tart pan" otherwise known as the paniusetomakecakes. 
Now this is probably where I screwed up so be careful. You are supposed to pour in the mixture BUT DO NOT COMPRESS IT! Just make sure there aren't any holes. 
Then you add the apples and then you add whatever is left on the mixture on top of them. 
And you bake. 
40-45 minutes. 
Now you have to wait it cools off entirely before you removing it from the tart pan or thepaniusetobake. 
Then just serve and top with with nice fresh homemade natural yogurt w/ vanilla icecream n.n

Don't you wish you'd been invited for dinner at my place?